Crypto leverage trading for beginners step by step sounds simple on paper. You put up $100, borrow $900 from the exchange, and trade with $1,000. If Bitcoin moves 5% in your favor, you just made $50 instead of $5. But there is a reason that roughly 70-80% of retail futures traders lose money - and leverage is usually the accelerant.
This guide walks through your first leveraged crypto trade from start to finish. No theory-heavy fluff. Just the steps, the math, and the mistakes that blow up accounts so you can avoid them.
What Is Leverage Trading in Crypto?
Leverage trading means borrowing funds from an exchange to open a position larger than your account balance. When you see "10x leverage," that means every $1 you put up controls $10 worth of crypto.
The exchange requires you to deposit collateral, called margin. If the trade moves against you far enough, the exchange closes your position automatically. That is a liquidation, and it is the single biggest risk in leverage trading.
Here is a quick breakdown of what different leverage levels actually mean:
- 2x leverage: $500 margin controls $1,000. Liquidation at roughly 50% move against you.
- 5x leverage: $200 margin controls $1,000. Liquidation at roughly 20% move against you.
- 10x leverage: $100 margin controls $1,000. Liquidation at roughly 10% move against you.
- 50x leverage: $20 margin controls $1,000. Liquidation at roughly 2% move against you.
Bitcoin moved 3.9% in the past seven days alone. At 50x leverage, that single week of price action would have wiped out your entire position if you were on the wrong side. This is why experienced traders rarely touch anything above 10x - and most stick to 3-5x.
Step 1: Pick an Exchange That Supports Leverage Trading
Not every exchange offers futures or margin trading, and the ones that do vary wildly in fees, available pairs, and maximum leverage. For beginners, you want low fees, a clean interface, and solid liquidation protection.
A few things to look for:
- Maker/taker fees - These eat into profits fast on leveraged positions. Even 0.01% difference matters when you are trading 10x your capital.
- Insurance fund size - A well-funded insurance pool means less risk of auto-deleveraging (where winning positions get forcibly reduced).
- Isolated margin support - This lets you limit your risk to the specific position rather than your whole account.
Exchanges like Bitunix offer competitive fees and up to 125x leverage across hundreds of pairs, though again - just because high leverage exists does not mean you should use it.
Ready to Practice Your First Leveraged Trade?
Bitunix offers demo trading so you can learn without risking real money - plus up to $5,500 in welcome bonuses when you go live.
Step 2: Understand Margin Types Before You Open a Position
Every futures exchange gives you two margin modes: cross margin and isolated margin. Getting this wrong is one of the most common beginner mistakes.
Isolated margin means the exchange can only liquidate the specific amount you assigned to that trade. If you put $100 into a BTC long with isolated margin and it gets liquidated, you lose $100. The rest of your account stays untouched.
Cross margin uses your entire account balance as collateral. This gives you a wider liquidation buffer, but if the trade goes badly enough, it can drain your whole account. For a deeper comparison, check out our breakdown of cross margin vs isolated margin.
The beginner rule: Always start with isolated margin. You want to know exactly how much you can lose on each trade before you enter it.

Step 3: Calculate Your Position Size (The Math That Keeps You Alive)
Position sizing is the boring part of trading that nobody talks about on social media. It is also the single biggest factor in whether you survive long enough to become profitable.
Here is a simple formula:
Position size = (Account balance x Risk per trade) / Distance to stop loss
Say you have $1,000 in your account and you are willing to risk 2% per trade ($20). Your stop loss is 4% below your entry. Your position size should be $500 ($20 / 0.04 = $500). That means you need 0.5x leverage - not even full leverage.
Most beginners skip this step entirely. They deposit $500, crank leverage to 20x, and open a $10,000 position. A 5% move wipes them out. The position sizing calculator we built can help you run these numbers before every trade.
Step 4: Place Your First Leveraged Trade
Here is the actual step-by-step for opening a long position on Bitcoin futures. The interface varies by exchange, but the core process is the same everywhere:
- Transfer funds to your futures wallet. Most exchanges separate spot and futures balances. Move USDT from spot to futures.
- Select the trading pair. For your first trade, stick with BTC/USDT perpetual. It has the most liquidity and tightest spreads.
- Set your margin mode to isolated. Do this before entering the trade.
- Choose your leverage. Start with 3x or 5x. You can always increase later once you understand how it feels.
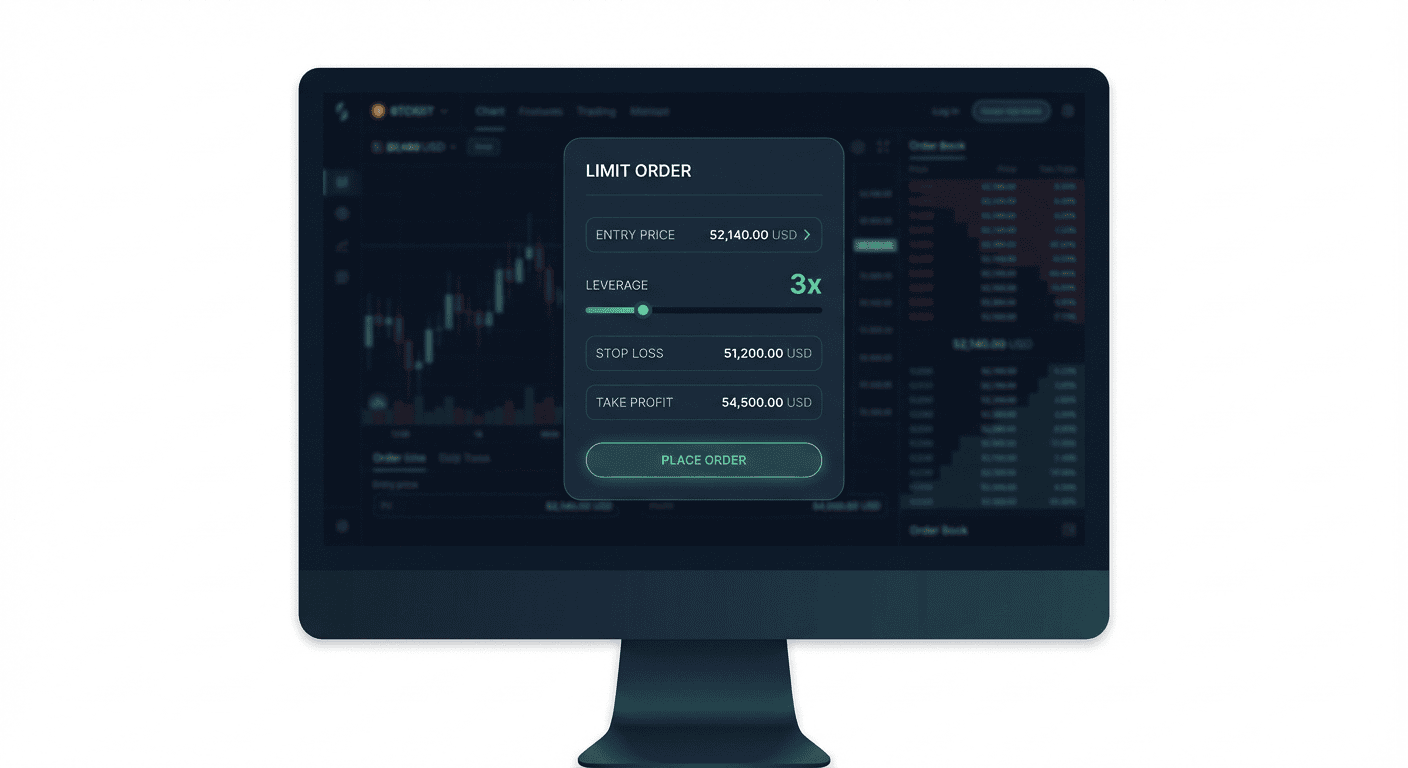
- Set your entry order. Use a limit order at a price you have identified as support. Market orders cost more in fees and guarantee worse fills.
- Set your stop loss immediately. Before the trade even fills. A leveraged position without a stop loss is gambling, full stop.
- Set your take profit. Know where you are getting out before you get in. A common beginner ratio is 1:2 risk-to-reward (risking $20 to make $40).
That is the whole process. Seven steps. The hard part is not the mechanics - it is the discipline to follow them every single time.
Leverage Trading Risk Management: The Non-Negotiable Rules
Risk management is not optional in leverage trading. It is the entire game. Here are the rules that separate traders who survive from those who blow their accounts in the first month:
Never risk more than 1-2% of your account on a single trade. This means if you have $1,000, your maximum loss on any trade should be $10-$20. Not $100. Not $200. If that sounds too conservative, consider that even a string of 10 losing trades only costs you 10-20% of your account at this rate. You can recover from that. You cannot recover from a liquidation that takes 50%.
Always use stop losses. There is no scenario where "holding and hoping" works with leverage. The funding fees alone will eat you alive, and a sudden move can liquidate you before you even open your app.
Track your funding rates. Perpetual futures charge or pay a funding rate every 8 hours. If you are long during a bullish period, you might be paying 0.01-0.1% every 8 hours. On a 10x position, that adds up fast. Our guide to calculating futures PnL breaks down exactly how these fees affect your bottom line.
Do not add to losing positions. "Averaging down" on a leveraged trade is how accounts go to zero. If your thesis was wrong, accept the loss and move on.
Trade With Proper Risk Management Tools
Bitunix gives you isolated margin, customizable leverage, and built-in stop loss orders - plus up to $5,500 in bonuses to start.
Common Leverage Trading Mistakes That Wipe Out Beginners

After watching thousands of traders in crypto communities, the same mistakes come up over and over:
Using max leverage on every trade. Just because an exchange offers 100x does not mean you should use 100x. Most profitable futures traders use 3-10x. The leverage slider is not a "how much money do I want to make" dial - it is a "how fast do I want to get liquidated" dial.
Trading altcoins on high leverage. BTC might move 5% in a day. Some altcoins move 20-30% in hours. A 10x leveraged position on a low-cap altcoin can get liquidated in minutes during a volatile session. If you are new to leverage, stick to BTC and ETH.
Ignoring fees. A 10x position means 10x the fee impact. If maker fees are 0.02%, opening and closing a 10x position costs you 0.4% of your margin. On tight scalps, fees can eat your entire profit. Always factor fees into your trade plan.
Revenge trading after a loss. You just got liquidated. You are angry. You open a bigger position to "make it back." This is the single fastest way to empty an account. After a loss, step away. Come back tomorrow.
No trading journal. If you are not tracking your trades, you have no way to know what is working and what is not. Write down every entry, exit, and the reasoning behind it. Review weekly. The trading journal guide covers both the tracking and the tax benefits of keeping records.
The Bottom Line on Leverage Trading for Beginners
Leverage trading is a tool. Like any tool, it can build something or it can hurt you, depending on how you use it. The traders who survive long enough to become consistently profitable all share the same traits: small position sizes, strict stop losses, low leverage, and the patience to wait for high-probability setups instead of trading every candle.
Start with 3x leverage on BTC with isolated margin. Risk 1-2% per trade. Use limit orders. Set your stop loss before the trade fills. Track everything. That is the entire playbook. It is not exciting. But the traders posting screenshots of 100x wins are not showing you the nine liquidations that came before.
The market will be here tomorrow. Your account should be too.